Ikea just celebrated its 30th anniversary in the U.S. What better way to honor everybody’s favorite ready-to-assemble furniture company than with a roundup of super-creative Ikea hacks?
The best Ikea hacks
Girl in the Garage
We’ve scoured the Internet for the best DIY projects that turn plain Ikea pieces into furniture that wows.
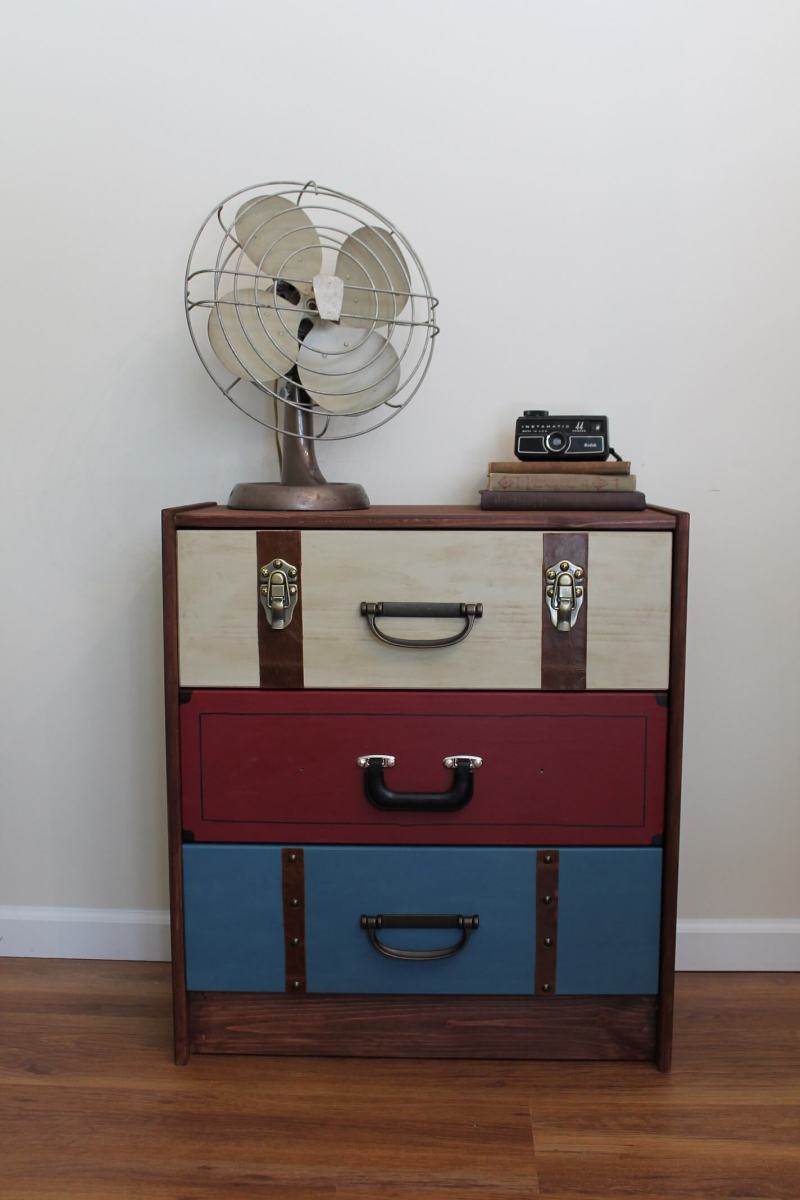
Quirky “suitcase” dresser
This hack puts an eccentric twist on everyday decor. By swapping out boring old knobs for unique drawer pulls, it creates the illusion of stacked, vintage-style luggage.
“I love to travel, so I painted an Ikea Rast dresser to look like suitcases stacked together,” says Jen Crider, aka the Girl in the Garage. “Just looking at it reminds me of all the wonderful places I’ve been and memories I’ve made.”
You can also pull off this hack with any other standard set of drawers, but it’s the leather scraps and old suitcase accessories that really give the finished piece some character.
For full instructions, click here.
Farmhouse-chic coffee table
If you’ve been on Pinterest lately, you know that the farmhouse theme is trending hardcore right now. But who says you have to spend a fortune creating the look? Blogger Natalie Dalpias of The Creative Mom cracked the code with this DIY coffee table upgrade.
“I love using rustic, charming, one-of-a-kind pieces of furniture in my home,” she says. “So when I needed a coffee table in my living room, I knew I wanted it to be a farmhouse-style coffee table. Instead of building it all myself, I used the Hemnes coffee table from Ikea and gave it a little facelift.”
The best part? It only cost $10 in lumber and a few hours of work to pull it off.
For full instructions, click here.
Eclectic drink bar
Bar carts are in right now, but they often come on wheels. Another downside is that the shelves aren’t usually enclosed. For a cleaner look, start with a traditional Ikea dresser—then take it up a notch.
DIY blogger Jenna LaFevor of Rain on a Tin Roof came up with a clever (and super-cute) way to store booze, soft drinks and cocktail accessories. She basically incorporates some bohemian-inspired paint and gold accents to turn the traditional bar cart on its head.
“I love this piece because it’s so functional,” says LaFevor. “It can be a drink bar, but it’s small enough that I can move it elsewhere and use it for storage for toys, household items or anything else.”
We’ll admit; this project may be intimidating for DIY newbies. (It involves sawing, wood putty, painting and more.) But the final result is just so glam.
For full instructions, click here.
High-end gold and marble shelves
Looking to add some glam in your life? This hack majorly transforms an ordinary glass shelf into a luxe unit for showcasing everything from books to accent pieces.
“We love this project for the simple ease of execution and the time factor,” says Erin Lepperd of Style Me Pretty. “If you can spray paint and use scissors, you’ll be a pro.”
This faux high-end project is actually a totally budget-friendly piece. The transformation relies on gold spray paint and some marble contact paper—that’s it. Lepperd adds that the whole shebang shouldn’t cost more than $100.
For full instructions, click here.
Rainbow play chairs for kids
After having kids, it’s only a matter of time before your home is overrun with toys and playthings. If kids furniture has to be visible, why not at least make it look cute? Merete Coleman, who does production design and photo styling work, came up with a genius hack—use yarn to give miniature play chairs a boho-chic look.
“Ikea furniture has simple clean lines, which makes it perfect for a hack,” says Coleman. “I love to create something unexpected, colorful and more comfortable for my children’s decor. I hadn’t seen too many things done with yarn and furniture, so I thought it might be fun to see a piece of furniture entirely covered in yarn.”
For this project, Coleman used Ikea kids chairs and a handful of colored yarn in complementary hues. From there, she simply wrapped the chair’s legs and base in colored patterns, creating the illusion of stripes. Slightly time intensive? Yes, but totally worth it.
For full instructions, click here.